
Key concepts
Physics
Engineering
Potential energy
Kinetic energy
Conservation of energy
Introduction
You probably know what a catapult is. In the Middle Ages armies would use them to hurl stones at castle walls. But did you know about an even bigger type of medieval siege weapon called a trebuchet? Try this project to build a miniature version!
Background
The Bring Science Home activity Build a Catapult showed you how to build a miniature catapult out of popsicle sticks and rubber bands. This catapult worked by storing elastic potential energy—the type of energy you get from stretching something such as a rubber band or a spring—and rapidly converting it to kinetic energy (the energy of motion) of a projectile (in that case a cotton ball).
On supporting science journalism
If you're enjoying this article, consider supporting our award-winning journalism by subscribing. By purchasing a subscription you are helping to ensure the future of impactful stories about the discoveries and ideas shaping our world today.
A trebuchet works differently. It relies on gravitational potential energy—the type of energy you get by raising something up off the ground. A trebuchet has a lever arm with a large, heavy counterweight on one end and a smaller projectile on the other end. When the counterweight is raised up, it has lots of gravitational potential energy. Then the counterweight is allowed to fall, rotating the lever arm and converting that potential into kinetic energy in the projectile, which is flung through the air.
Many medieval trebuchets were larger and could hurtle projectiles even farther than catapults. Get ready to build your own!
Materials
Piece of corrugated cardboard, about one foot by one foot
Popsicle sticks
Scissors
Pencil
Jumbo or "milk shake" straw
Glue (A hot glue gun is best if available, but use caution and adult assistance when using hot glue.)
Tape
Rubber bands
String
Paper clip
AA battery
Preparation
Assemble all your materials in a location that is open and clear of people, animals or breakable objects so that you can test your trebuchet. Safety note: Never aim projectiles at people or animals. A toy trebuchet might seem harmless, but even a small projectile can cause eye damage.
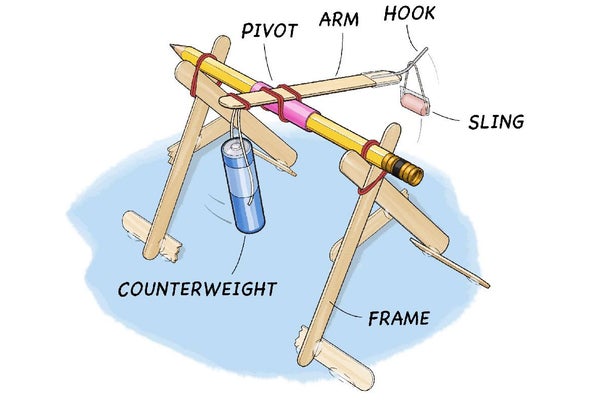
To build your trebuchet, you will build a frame that looks almost just like a swing set. It will have two "A-frame" shaped pieces on the sides and one crossbar on the top. There is more than one way to do this, so the procedure described here is just one method. For example, you could decide to build the entire frame out of pencils instead of popsicle sticks and you can choose whether you want to use tape, glue or rubber bands to secure the different joints. Think of this as an engineering design project—there is no single “right answer” or correct way to build the trebuchet. You can modify your design based on your own ideas and the materials you have available.
Start out by building the two side A-frame pieces. Take five popsicle sticks and cut one of them in half. Use two long pieces and one half-piece to form an “A” but make sure you cross the long pieces slightly at the top to form a miniature "V" shape. This will leave a small notch for the pencil to rest in later. Glue them together and repeat with the other pieces.
Carefully cut slots in your piece of corrugated cardboard that will allow your A-frame pieces to stand up straight, a few inches apart from each other. Stick the ends of the A-frame pieces into the slots. Reinforce the connections with glue, tape and some extra popsicle stick pieces if necessary so they remain standing on their own.
Now you will build the trebuchet's arm. Carefully cut two small notches on either side of a popsicle stick close to one end. The notches should be wide enough to slide in a piece of string. This will help hold your counterweight in place.
Attach a small loop of string to your AA battery using tape or rubber bands. Hang the battery from the notches in the popsicle stick. If necessary, make the notches deeper or secure the string with tape, glue or rubber bands. Why do you think it is important in this design to have a counterweight? How does it help employ the idea of gravitational potential energy?
Unbend one end of a paper clip so it is almost, but not quite, straight. Attach the remaining flat part of the paper clip to the other end of the popsicle stick, with the straightened part pointing outward and up (away from the counterweight). This will serve as a hook to hold the "sling," which in turn holds the projectile.
Remove the eraser from the pencil and attach it to a small loop of string. Hang the eraser from the paper clip hook.
Cut a small section of milk shake straw, about one inch long. Attach this perpendicular to the popsicle stick arm using glue, rubber bands or tape. The straw should be much closer to the counterweight than it is to the hook. (This distance is something you can try adjusting later.)
Slide the pencil into the milk shake straw.
Place the pencil into the two V notches on top of your A-frame pieces. Secure it in place with rubber bands. This forms a crossbar and completes your trebuchet's frame. The straw and pencil form a pivot and should allow the arm to rotate. (We do not recommend using glue for this step—that way you can remove the crossbar and swap out the arm to make changes.)
Make sure your trebuchet is sturdy and the frame holds together. Try rotating the arm with your hand. If any of the joints seem weak or the frame wobbles significantly, reinforce them with tape, glue or rubber bands.
Procedure
Now it is time to test your trebuchet. Use one hand to pull down on the eraser. This should raise the counterweight up in the air. Then, making sure no people, animals or breakable objects are nearby, let go. What happens when you let the eraser go? Does it get launched forward? Does it go straight up in the air? Does it fail to release at all?
Now you might need to tinker with your trebuchet in order to get the best launch. Try pulling the eraser under the trebuchet frame. It is okay if the eraser is resting on the ground and there is slack in the sling. When the counterweight falls, it will drag the eraser along the ground and then pull it up into the air. Can you find the best starting point for the eraser? What makes it go the farthest?
Extra: There are lots of variables you can tinker with to improve your trebuchet’s performance. Try changing any of the following things to see how they affect the distance the eraser is thrown. Can you optimize your design to toss the eraser as far as possible?
The size of the counterweight: Try using lighter (or heavier) batteries. What impact do you think the weight of the counterweight will have on your projectile?
The length of the lever arm: Both the overall length and the ratio between the distance from the pivot to the counterweight and the pivot to the sling. What happens if you move the pivot so it is exactly in the middle of the arm? What if you glue multiple popsicle sticks together to make a longer arm?
The length of the sling: What happens if you make it longer or shorter?
The shape of the hook: What happens if you bend the paper clip so it is straighter or more curved or if it is cut to be shorter?
The weight of the projectile: What happens if you use something other than an eraser, such as a small balled up piece of paper?
Observations and results
When you pull down on the eraser, this causes the battery to lift up in the air, giving it (gravitational) potential energy. When you release the eraser, the battery falls and its potential energy is converted to kinetic energy of the eraser. As the arm swings, the sling holding the eraser slides off the hook and the eraser's kinetic energy causes it to fly through the air as a projectile.
Depending on exactly how you built your trebuchet, the results you see will vary. Remember that there is no single “correct” way to build the trebuchet. A well-built trebuchet should be able to hurl an eraser a few feet. Don't get discouraged if at first your trebuchet launches the eraser straight up in the air or fails to release it at all. You should be able to tinker with your design a bit (see recommendations at the end of the procedure) to get your eraser to launch.
More to explore
Trebuchet Physics, from Real World Physics Problems
Effect of Trebuchet Arm Length or Counterweight Mass on Projectile Distance, from Science Buddies
Science Activities for All Ages, from Science Buddies
Editor’s Note: The design used in this experiment was inspired by the book Mini Weapons of Mass Destruction: Build Implements of Spitball Warfare, by John Austin, which contains many more designs for mini siege weapons you can build from common household supplies.
This activity brought to you in partnership with Science Buddies

