
Key concepts
Soil erosion
Ecology
Geology
Introduction
Perhaps you try to save water. Maybe you already reduce, reuse and recycle. But did you ever consider conserving soil? Perhaps you haven't, but soil erosion—the wearing away of soil by water, wind and other natural forces—can be a major ecological problem. Productive farmlands can disappear as nutrient-rich topsoil in fields washes away when heavy rains hit them. Waterways can then become polluted as pesticides and fertilizers wash into them. Even human life and property are jeopardized when soil erosion causes mud- and landslides. The economic cost of soil erosion is estimated to be several billion dollars every year for the U.S. alone. This is a serious problem; can you help solve it? Do this activity and learn how to help save the soil with nothing more than a few plants!
Background
Soil erosion is partially caused by rain runoff washing away the soil. “Runoff” refers to the water that flows over soil’s surface. It occurs when the soil is saturated or unable to absorb more water.
On supporting science journalism
If you're enjoying this article, consider supporting our award-winning journalism by subscribing. By purchasing a subscription you are helping to ensure the future of impactful stories about the discoveries and ideas shaping our world today.
One way to help combat soil erosion uses plants, which have extensive root systems that can help to "grab onto" soil and keep it clumped together. You might have seen this when you pulled a plant such as a weed or vegetable out of the ground and a clump of soil clung to its roots. Plants also help absorb some of the water in the soil. These effects make it harder for water to wash the soil away. Plants also help reduce erosion in other ways, such as breaking the wind that might blow dry topsoil away.
Now that you know more about soil erosion, let's see how rain contributes to water erosion.
Materials
Scissors or sharp knife (Have an adult help when using these implements.)
Clean, empty one-gallon container with lid (such as a plastic milk jug)
Water
Two aluminum bread pans (Alternatively, you can use two sturdy shoe boxes that are similar in size. Make sure they are at least seven centimeters deep.)
Dirt (potting soil works well)
Two aluminum, nine-by-13-inch cake pans (Alternatively, you can use shallow plastic containers that are about three centimeters deep and wide enough for the short side of the bread pans or shoe boxes to rest in the containers.)
12 to 14 plastic forks
Two blocks, shallow plastic containers or other objects that can be used to prop up one edge of a bread pan to a height of roughly three to five centimeters (Make sure both items are the same height and that these objects can get wet. Avoid using those that shouldn't get wet, such as books.)
Outdoor test area with a flat, level surface where it is easy to clean spilled water and soil (You will likely spill water and soil in this activity. Be sure to protect your surface or use a surface that will not be ruined if it gets wet and dirty.
Small gardening shovel, cake server or spatula (optional)
Preparation
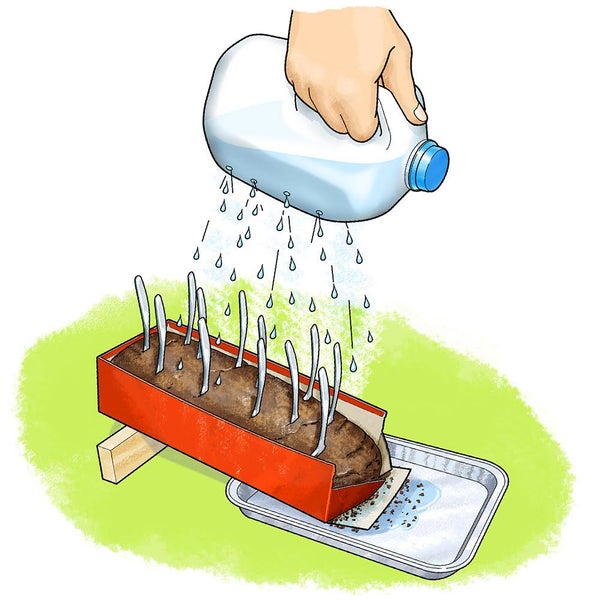
Ask an adult to use the scissors or knife to poke one hole just above the handle of the one-gallon container. This hole will allow air to enter the watering can as liquid pours out. It can be quite big, one half to one centimeter works well. (Note: If you have a watering can with a rain sprout that pours in many small rainlike streams, you can skip these steps and use the watering can to simulate rain.)
Ask an adult to poke holes in the top of the jar on the opposite side of the handle for the “rain” (water) to come out. Three rows of five holes each works well. These holes need to be a little smaller, about a two-millimeter diameter works well. Do not worry if the holes are not exactly the same size or are not neatly organized in rows. You can test how it simulates rain and make adjustments if needed. Do you think the number and/or size of the holes will change the type of rain you will create?
To test your watering can fill it halfway with water and close the container. Over a sink or in an outdoor area that can get wet, tilt the can so water pours from the smaller holes. Does it mimic rain well? Play around with the angle at which you tilt the container. If water runs down the side of the container, tilt it more. If the rain comes out of the big hole as well as the little ones, you tilted the container too far. What type of rain do you get: heavy downpour, steady rain, drizzle? Make adjustments to the holes if needed. The goal is to mimic a steady, heavy rain.
Fill the two bread pans with soil. While you do so, break up any clumps of soil that are present. Leave a little space at the top so the soil so runoff does not flow over the edges. The layer of soil should be at least six centimeters deep.
Ideally, you would grow plants in one pan. That takes time! To complete this project more quickly, you will use plastic forks to simulate plants. The tines and curved area of the forks will simulate the root system.
"Plant" forks in one box. Distribute the forks around so the area is evenly covered. Plant the forks deep into the soil so the curved areas of the forks with the tines (pointy parts) are in the soil and only the handles stick out. Now remove the top half of one short side of each bread pan. To do so, use a small gardening shovel, cake server, spatula or your hands to make two vertical cuts on one short side of a bread pan where it meets the longer sides, then fold down or remove a little over half of that short side to expose the soil. This will allow soil to flow out of the bread pan when you do your erosion test. Repeat this step with the other bread pan.
Place a block (or object that can get wet) with a height of three to five centimeters next to an empty cake pan on your flat work surface. (The cake pan will collect erroded soil.)
Place the "cut end" of a bread pan into the cake pan and push the block back until the other end of the bread pan rests on the block. The surface of the soil will be at an angle. This allows you to mimic a small slope like the slope of a hill. Do you expect runoff to be a bigger problem on hillsides compared with flat surfaces?
Repeat the previous step with the other cake pan, block and bread pan so you have two identical setups: one where the soil contains forks (substitute plants) and another with bare soil. Leave some space between the setups so spilled water and soil from one setup does not interfere with the other.
Procedure
Fill your watering container three fourths full of water.
Use your watering container to simulate rain over one bread pan or shoe box. Hold the watering container up high enough so rain falls on the entire width of the bread pan at once. If you are unable to cover the entire length of the bread pan at once, however, concentrate on the its upper part. Be prepared—water will go to the sides of the pan and soil might splatter out of the pan, which is why you needed to protect your work surface. Make observations as rains comes down on the soil. What happens first? Do you see changes in the soil surface? Do you see splats of soil? Does runoff (water flowing over the soil surface) occur instantly? Do you see a sudden change after a little while? Why do you think would this change happen? Water this soil until the watering container is empty.
Fill your watering jar three fourths full again and use it to simulate rain in a smiliar way over the other bread pan or shoe box. Make sure you fill the watering container to a similar level, tilt the container in a similar way and hold it at a similar height. Why do you think this is important? Would changing these variables considerably simulate rain with a different intensity? Do you think the rain intensity influences the type and amount of erosion damage it causes?
Water the second bread pan or shoe box until the container is empty. What do you observe this time? Do you see any differences between the two experiments?
Depending on the type of soil and size of your bread pans or shoe boxes, you might not see sizable erosion occur after the first downpour. If this is the case, fill you your watering jar halfway and simulate another downpour on your bread pans or shoe boxes, one at a time. If needed, repeat until you observe sizable erosion happening in at least one bread pan or shoe box. Does erosion happen after the same amount of rain for both setups?
To see the amount of eroded soil in your cake pan, slightly tilt the cake pans (one at a time) to drain the water. Some soil suspended in the water will drain out with it but the majority of the eroded soil will settle to the bottom and stay in the pan.
Compare the amount of eroded soil collected for both experiments. Do you find more, less or equal amounts of eroded soil?
How do you think forks are similar to small plants? How do you think they are different? Do you think having small plants in the bread pan or shoe box would have helped reduce erosion further?
How do you think real-world situations might be similar to or different from your test?
Extra: Try this experiment with different soil types. Are some more susceptible to erosion than others?
Extra: Grow radish sprouts or other fast-growing plants in a bread pan. Redo the test, now comparing bare soil with soil covered with sprouts. Be sure to use a bread pan for this; a cardboard shoe box will soften when filled with moist soil for a longer time. Would plant sprouts used in this test be a good substitute for full-size plants or trees in real situations? Which one do you expect to hold soil best, forks, sprouts or full-grown plants?
Extra: Look up more details about the different types of water erosion. Sheet, rill, gully and splash are some examples. What type of erosion do you observe during your experiment?
Extra: The next time you go for a nature walk, look around. Can you find signs of water or wind erosion? Tip: Try looking at steep hillsides and/or stream or creek beds. Why do you think these areas would be prone to erosion?
[break]
Observations and results
Did you find more soil was washed away from the bread pan or shoebox filled with bare soil? Initially, you might have seen that the impact of heavy raindrops falling on the soil causes pieces to break away, leaving little dips. Maybe you observed soil splatting away as a result.
At the start, the soil could probably absorb most of the rain. It acts like a sponge, holding the water. With a prolonged downpour, however, the soil is not always able to absorb the water fast enough and you likely observed excess water starting to flow on top of the soil. Sooner or later you should have observed excess water flowing down, as the soil becomes saturated and could not absorb more water.
The water flowing on top of the soil is called runoff. As it flows, it carries loose soil with it. The amount of soil transported depends on the speed and volume of the flowing water as well as the type of soil and its slope. Although forks cannot hold on to soil as well as plants do, they do help hold it together and ward off larger layers of soil sliding down. As a result, you probably collected more eroded soil from rain falling on the bare soil.
Cleanup
You can reuse the soil from this activity for planting potted plants, starting seedlings or (with permission) adding to plants' soil outside. The soil might be too saturated to use right away; if this is the case, try letting it dry out for a day or more before reusing it. Don't forget to recycle your homemade watering can if it can be recycled where you live—or continue to use it to water your own plants!
More to explore
Can Plants Stop Soil Erosion? from Science Buddies
Water Erosion, from Plant & Soil Sciences eLibrary
Soil Science: How Moist Is That Mud? from Scientific American
This activity brought to you in partnership with Science Buddies

