
Key Concepts
Chemistry
Materials science
Polymers
Volume
Absorption
Introduction
When we think about diapers we usually think about babies. But did you know that astronauts also have to wear diapers sometimes? Astronaut “diapers” are called maximum absorbency garments (MAGs), and astronauts wear them when they have to stay sealed in their spacesuits for long periods of time, such as during spacewalks or when their spacecraft leave orbit to reenter the atmosphere to return home.
For babies and astronauts, the most important thing for a diaper is to prevent leaks. But did you ever wonder how a disposable diaper actually works? What's inside the diaper that allows it to absorb all that wet stuff without making a mess? In this activity we're going to explore the substance in diapers that allows them to stay leak-free—in a cradle and in outer space!
On supporting science journalism
If you're enjoying this article, consider supporting our award-winning journalism by subscribing. By purchasing a subscription you are helping to ensure the future of impactful stories about the discoveries and ideas shaping our world today.
Background
Whether it is made for a baby or an astronaut, the major disposable diaper brands all contain a powdery chemical absorbent called sodium polyacrylate, which can absorb over 300 times its weight in water! That's about equivalent to a normal adult being able to suddenly absorb the weight of a blue whale, about 40,000 pounds!
Being able to absorb a lot of liquid is what makes sodium polyacrylate important in diapers. The chemical absorbs the liquid in the diaper, pulling it away from the skin. The diapers that astronauts wear can absorb two liters of water—the same amount of liquid that's in a big soda bottle at the grocery store! And thank goodness that they can absorb this much, because nobody wants to have a wet diaper while they're fixing a spaceship!
In this activity you're going to separate sodium polyacrylate from diapers, and test its absorbency (how much liquid it can hold) for yourself. One way you will measure this is by measuring volume, which means the amount of space that a substance occupies. In this case you'll be measuring the volume when you mix different amounts of sodium polyacrylate with water.
Materials
Adult helper
Eight clear plastic cups (A glass will also work, as long as it is clear.)
Two to three disposable diapers (The number needed will vary slightly depending on size and brand.)
Food coloring
Permanent marker
Scissors
One clean, gallon-size, zip-top bag
Measuring spoon
Measuring cup
A spoon or something else to use as a stirrer
A work space that can get wet and/or newspaper to cover it
A teaspoon of table salt (optional)
Preparation
If desired, spread a few sheets of newspaper over your work space. The chemical you'll be working with is perfectly safe, but this will help with cleanup.
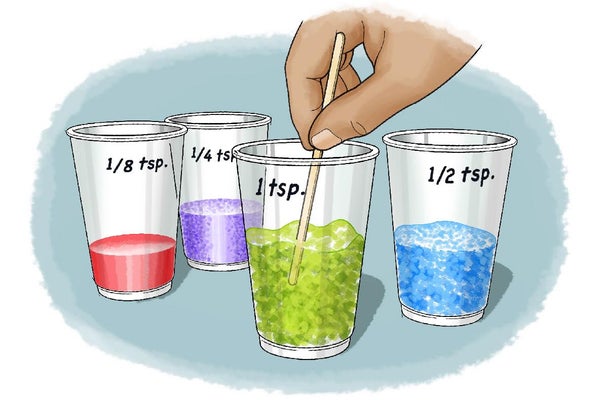
Use the permanent marker to label four of the cups. (If you're using glass cups, write the labels on a piece of tape and stick the tape to the cup.) Label the cups as follows: cup 1—one eighth teaspoon, cup 2—one quarter teaspoon, cup 3—one half teaspoon, cup 4—one teaspoon.
Place two to three drops of food coloring in the four unlabeled cups. Use the measuring cup to pour one third cup of water into each cup. Use a spoon or stirrer to mix the coloring and water.
Open a diaper on your work space. Have an adult help you use the scissors to cut through the inside lining of the diaper and remove the powdery, cottonlike stuffing material inside. Place the stuffing in your zip-top bag.
Check the diaper for any leftover powder—either scoop this up with your hands (or use your spoon) or you can carefully pick up the diaper and shake the remaining powder into the zip-top bag.
Set the diaper aside. With all the stuffing inside the bag, carefully seal it and shake the bag for one to two minutes. You should see more powder collecting at the bottom of the bag as you shake it loose from the stuffing.
Carefully remove the stuffing from the zip-top bag (It is okay if there is a little left inside.)
If necessary, repeat this process with one to two more diapers until you have collected at least two teaspoons of the powder in your bag.
Procedure
Use your measuring spoon to transfer the appropriate amount of powder from the bag to the corresponding cup. Start by putting one eighth teaspoon of powder into the cup labeled “one eighth teaspoon,” then one quarter teaspoon of the powder into the cup labeled “one quarter teaspoon,” etcetera. Continue until you've put the correct amount of powder into each labeled cup. Notice the look and texture of the powder. How much space does it take up in the cup?
With help from an adult, carefully pour one third cup of the colored water you measured into the cup labeled “one eighth teaspoon”. Use your spoon to stir the water and powder. Stir the liquid for approximately one minute. What do you notice about the water as it mixes with the powder? Is the consistency changing as you stir? Can you still see the powder?
Repeat this process, pouring one third of the colored water you measured into the cup labeled “one quarter teaspoon”. Use your spoon to stir the water and powder for approximately one minute. What do you notice about the water as it mixes with the powder? Is the mixture's appearance changing as you stir? What about the consistency of the mixture? Is it different from the mixture in the one-eighth-teaspoon cup?
Repeat this process, pouring one third of the colored water you measured into the cup labeled “one half teaspoon”. Stir the water and powder for approximately one minute. What do you notice about the water as it mixes with the powder? Is the mixture's appearance changing as you stir? What about the consistency of the mixture? Is it different from the mixture in the one-quarter-teaspoon cup?
Repeat this process a fourth time, pouring one third of the colored water you measured into the cup labeled “one teaspoon”. Stir the water and powder for approximately one minute. What do you notice about the water as it mixes with the powder? Is the mixture's appearance changing as you stir? What about the consistency of the mixture? Is it different from the mixture in the one-half-teaspoon cup?
Line up all four of the labeled cups. You can observe the volumes of the mixtures in each by noticing the height of the liquid in the cup labeled “one eighth teaspoon”. Compare this to the heights of the mixtures in the other cups. Which cup has the largest volume? Which has the lowest? What other differences do you notice about the mixtures in the different cups? Do they look different? Do they feel different?
Extra: Using your measuring spoon, add one teaspoon of salt to the mixture in the cup labeled “one teaspoon”. Stir the mixture for about one minute. What do you notice happening to the mixture as you stir? Is it changing? What is different about it after adding the salt?
Extra: Try increasing the amount of powder up to one tablespoon, always adding one third cup of water. Notice how the consistency changes as you increase the amount of powder.
Extra: If you have an extra diaper, try soaking it in water for a minute, then set it somewhere to dry. Observe whether the diaper changes shape or texture after being soaked in the water.
Observations and results
As the amount of powder increased in each cup, you may have noticed that the volume of the mixture increased. In addition, you should have noticed that texture of the powder changed. When there was enough powder to absorb all of the water, the powder went from tiny crystals to larger gel spheres, almost the consistency of round pieces of rice. This is the expected result. Sodium polyacrylate is a polymer, which means it is a large chain of molecules made up of many smaller units known as monomers. Superabsorbent polymers expand when they come into contact with liquids like water, because water is drawn into and held by the molecules of the polymer. Therefore the sodium polyacrylate acts like an extremely powerful sponge!
If you tried adding salt to the mixture, you might have noticed that the texture and volume of the gel mixture changed back to a liquid. This is because salt breaks the attraction between water and polymer chains. The added salt breaks into negative and positive ions, which are also attracted to the water molecules. Each salt ion attracts several water molecules to it, thereby pulling them away from the polymer. Eventually enough water is pulled away so that the mixture goes from gel back to liquid.
More to explore
Polymer Absorbance: A Swell Project, from Science Buddies
Are you Gellin'?, from Science Buddies
The History and Science behind Expandable Water Toys, from Mental Floss
More Fun Science Projects, from Science Buddies
This activity brought to you in partnership with Science Buddies

