
Key concepts
Chemistry
Crystallization
Freezing
Molecules
Introduction
Pop science quiz: What happens to water when it reaches 0 degrees Celsius (32 degrees Fahrenheit)? Answer: It freezes! But does water always freeze when it reaches this temperature? Believe it or not, water can sometimes be cooled to temperatures below its freezing point and still remain liquid. In this state the water is supercool. How can this happen? In this activity you will create your own supercool water and initiate its transition from liquid to solid. All while making a tasty snack!
Background
When water is warm or even room temperature, its molecules are moving around, bumping into one another. The warmer the water, the higher the energy of its molecules and the more they collide with one another. In contrast, as water cools, its molecules move more slowly until they eventually almoststop moving altogether. In a frozen state water molecules are locked together in a crystalline array. These crystals are thought to form around impurities in the water such as dust and minerals. Without the presence of these impurities, however, the water can be supercooled past its freezing point.
On supporting science journalism
If you're enjoying this article, consider supporting our award-winning journalism by subscribing. By purchasing a subscription you are helping to ensure the future of impactful stories about the discoveries and ideas shaping our world today.
In this activity you will create a bath using salt and ice. Adding the salt results in a bath with a temperature below water’s freezing point, a phenomenon known as freezing point depression. You will use this bath to supercool the pure water it surrounds. Then you will perform some supercool tests on this water!
Materials
Ice
Fresh fruit, cut into large chunks (at least three pieces)
Wooden skewers (at least three)
Two tall, clear, clean plastic cups
Two large metal or glass bowls
Two kitchen thermometers (If you only have one, you can switch it between your two cups.)
Freezer
Distilled water
Clock or timer
Four to five tablespoons of salt
Cardboard
Scissors (and an adult’s help if needed)
Preparation
Put one piece of fruit on each skewer.
Place the skewers in the freezer for two hours.
Carefully cut two circles out of the cardboard, large enough to act as lids for the plastic cups.
Procedure
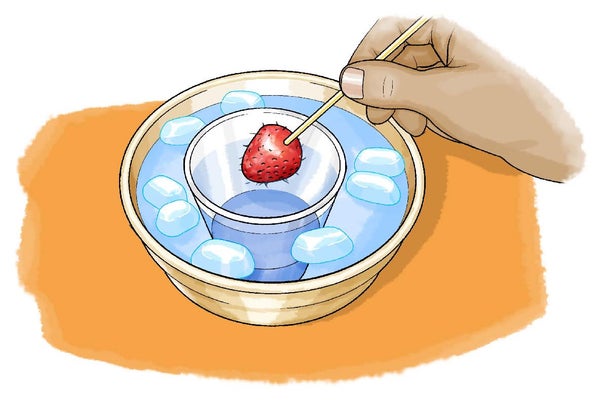
Fill each small glass cup one third full of filtered water.
Place one cup in the center of each large metal bowl.
Cover the plastic cups with your cardboard lids.
Surround each cup with ice. Make sure the ice is well packed around the cups and comes up higher than the height of the water in the cups. Don’t get any ice inside the cups.
Sprinkle at least two tablespoons of salt over the ice. Don’t get any salt inside the cups!
Remove the cardboard lids from the cups.
Monitor the temperature of the water in your cups using your thermometer(s). If you only have one thermometer, keep it in one cup until the water in that cup cools to below 30 degrees F. At that point you can remove the thermometer and check the temperature in the other cup.
Once the water has reached a temperature of less than 30 degrees F (or between –1 and –3 degrees C) your water is supercooled! This should take approximately 45 minutes.
Carefully remove the thermometer and set it aside.
Remove the frozen fruit skewers from the freezer. What do you notice about the surface of your fruit? Does it have ice on it?
Gently dip a piece of fruit (still on the skewer) into the first cup of supercooled water. Watch what happens to the fruit when it touches the water. What do you notice about the water surrounding the fruit? What about the fruit itself?
Carefully remove the fruit from the water. Look at the fruit. What do you notice about the fruit’s surface?
If there is any water left in the first cup, test the temperature of the remaining water. Wait for it to become supercool again, then repeat this experiment with your remaining fruit skewers!
For the second cup, take a fresh piece of ice (without any salt on it) and carefully drop it into your cup. What happens to the water in the cup when the ice reaches it? How does this compare with what happened to the fruit?
Observations and results
In this activity you made water really cold—in fact, you made it supercool! To understand what this means, imagine the molecules that make up the water in your cups. When water is warm or room temperature, those molecules move around, bouncing off one another and the sides of the cups.
When you remove the heat energy from the water in the cups, however, those molecules slow down and eventually nearly stop moving. When they practically stop moving, the molecules form crystals, like those you see creating frost on your windows or drifting from the sky as snowflakes. Crystals don’t just form on their own. Before you have a crystal you need a seed, something for the water molecules to hold onto as they arrange themselves. The water you used in your cups was distilled water and therefore generally free of contaminants such as dust and microbes. As a result, there wasn’t anything in the water for the molecules to crystallize around. Therefore, instead of crystalizing when it reached its freezing point, the water remained liquid.
This changed when you added your fruit and your ice cube to the water! The fruit and ice acted as the seed in your supercooled water, and gave the water molecules something to crystalize around. In the case of the fruit the ice crystals you noticed on the surface of the fruit acted as the seed. And in the second cup the ice itself was the seed!
More to explore
Supercooling Water and Snap Freezing, from Science Buddies
Scrumptious Science: Making Ice Cream in a Bag, from Scientific American
Science Activities for All Ages! from Science Buddies
This activity brought to you in partnership with Science Buddies

