
Key concepts
Temperature
Measurement
Thermal expansion
Introduction
Are you sometimes eager to understand how things work? Or excited about making useful objects and instruments yourself? Did you ever imagine you could build your own liquid thermometer? You'll be able to use it to track how temperatures vary with location—indoors or outdoors. What will turn out to be the hottest spot in your home? What about the coolest? Your very own homemade thermometer will be able to tell you!
Background
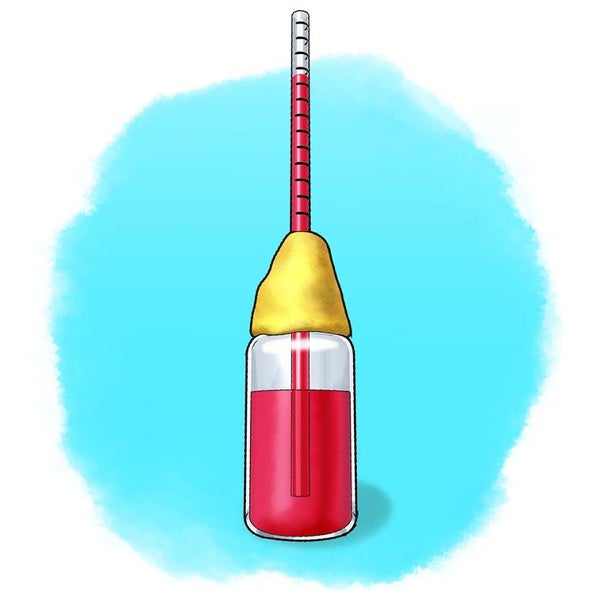
Liquid-filled thermometers have been used for centuries to measure temperature. They consist of a liquid-filled reservoir at the end of a narrow tube. If the temperature of the liquid in the reservoir increases, it expands and rises into the narrow tube. When the liquid cools, it contracts, allowing the liquid in the tube to fall to a lower level. Therefore, high levels of liquid in the tube indicate a higher temperature and low levels indicate a lower temperature. When calibrating the thermometer, the specific temperatures corresponding to the levels of the liquid in the narrow tube are marked on the outside of the tube. Now you understand how a liquid thermometer works, but why does it work?
On supporting science journalism
If you're enjoying this article, consider supporting our award-winning journalism by subscribing. By purchasing a subscription you are helping to ensure the future of impactful stories about the discoveries and ideas shaping our world today.
Scientists refer to the tendency of matter to change volume as a result of a temperature change as "thermal expansion and contraction." Gases expand and contract drastically. Fluids expand and contract, too, but their volume change is more moderate. Even solids change volume when they are heated or chilled. For example, bridges are a little bit longer on a hot day. The change in volume of solids is too subtle, though, to work in an everyday thermometer. Now that you understand more about liquid thermometers, it's time to get started actually making one!
Materials
Clear plastic drinking straw
Ruler
Fine-tipped permanent marker
Narrow-necked, small, plastic bottle with lid (Small bottles such as those for medicine, food-coloring or vanilla extract work well.)
Water
Rubbing alcohol (Work in a well-ventilated room, and do not leave the bottle of rubbing alcohol uncovered.)
A few drops or red, blue or green food coloring (Liquid food coloring works best.)
Paper towels
Modeling clay
Medicine dropper or syringe
Small bowl
Hot water
Ice cubes
Store-bought thermometer (optional)
Preparation
Empty and wash the small, plastic bottle.
The clear drinking straw will become the narrow tube of your thermometer. Use a permanent marker to make small marks on the straw, from the top down, at half-centimeter intervals. These marks will serve as level marks on your thermometer.
Modeling clay will seal the bottle's neck and hold the straw in place. Mold the clay until it feels soft and elastic; then form a ball and push it flat. This round flat piece of clay should be bigger than the neck of your bottle. Use your straw to punch a hole in the middle of this round piece of clay, just big enough to allow to straw to go through. Remove any clay clogging the straw.
Procedure
Add rubbing alcohol to the bottle, filling it about halfway up. (Reseal the bottle of rubbing alcohol immediately to minimize exposure to fumes and evaporation.)
Add a couple drops of food coloring to the alcohol, close the bottle and shake it so the liquids mix well. Why do you think it is important to color the liquid?
Fill a medicine dropper or syringe with the colored rubbing alcohol. Carefully set the medicine dropper or syringe aside, preferably on a paper towel in case any liquid leaks out. In case the level of the liquid in your bottle dropped below one fourth of the way up, add a little more rubbing alcohol to the bottle so the level is one fourth to halfway up the bottle.
Poke the straw through the hole in your modeling clay and place the clay on the bottle's neck so the straw hangs in the bottle. Adjust the straw so the end is immersed in the liquid but does not touch the bottom of the bottle. The majority of the straw will be sticking out from the bottle. Why do you think the straw should not touch the bottom of your bottle?
Use the modeling clay to seal the bottle opening and to hold the straw in place. Important: Make sure the clay forms a tight seal around the straw and over the bottle mouth of the bottle, but don't close off the straw's opening. Air should not be able to enter the bottle. Can you think of a reason why this is so important?
Drip the content of your medicine dropper or syringe—drop by drop—into the straw. What happens? Does this fluid rise up the straw and stay there?
Because no air can flow out of the bottle the air pressure inside keeps the level of fluid constant and a column of liquid can build up in the straw. Fluid running down the straw into the reservoir indicates a failure of the seal at the top of the bottle. If this happens, make sure the clay forms an airtight seal at the bottle's neck and around the straw and try again.
The fluid level in the column should reach about midway up the visible part of the straw. If needed, use the dropper or syringe to add more alcohol (uncolored is fine this time) to the straw.
Observe the fluid level in the straw. This level indicates room temperature. Use the permanent marker to make a small symbol indicating this fluid level on your straw.
To test the homemade thermometer, hold your hands around the base of the bottle and observe what happens. Be patient, it might take a little time before the fluid in the reservoir adjusts to its new situation. Does the fluid level in the straw change? Does it change a lot or just a little? Why do you think this happens?
How much will the fluid level change as you heat up the reservoir considerably? Add some medium-hot tap water in a small bowl and place your thermometer reservoir in the water. Give the thermometer a little time to work. How does the fluid level in the straw change? Did it change more than when you heated the bottle with your hands? Be sure to pay close attention and take the thermometer out of the water bath if the fluid rises to a level close to the top edge of your straw. What do you think could cause the fluid to flow over the edge of the straw? What could you change in your thermometer to prevent this from happening?
What do you expect will happen when the reservoir cools down to a temperature below room temperature?
Replace the medium-hot water in the bowl with cold water. Add ice cubes to the water so the water cools to 0 degrees Celsius (32 degrees Fahrenheit). Place your thermometer reservoir in the ice-cold water and let the thermometer adjust to its new situation. What happens? Is it similar or different from what you expected? Could this measurement help you add a scale to your thermometer?
Take your thermometer on a tour of your home or yard. Remember to give it time to respond to each new environment, keeping in mind there might not be noticeable differences if the temperature is relatively similar in different places. Tip: Look for areas of direct sunlight for warmer readings. Is one spot the warmest? What about the coolest?
Extra: Make a scale on your thermometer (also called "calibrating" the thermometer) with the help of a store-bought thermometer. Could you use the fact that in this temperature range, alcohol expands by equal amounts for each gained degree in temperature to make calibration easier?
Extra: You created this thermometer with a particular straw width. Try to build an identical thermometer, now with a narrower or wider straw. How do you expect the measurements to be different? Will this new thermometer be more or less accurate compared with your first thermometer?
Extra: You used rubbing alcohol for this thermometer. Try to make an identical thermometer, now using water as a fluid. Unlike water, which freezes at 0 degrees C and boils at 100 degrees C, rubbing alcohol freezes at −89 degrees C and boils at 82.5 degrees C. Which fluid would you choose to make a thermometer to measure the temperature in your freezer? What about in the kitchen to cook something on the stovetop?
[break]
Observations and results
Did you see the fluid rise as you heated the reservoir and fall as you cooled it?
As the temperature of the liquid in the reservoir increases, it expands, and the only place the liquid can go is up the narrow tube. If the temperature of the liquid decreases, it contracts, thereby allowing more liquid to collect in the reservoir. The level in the narrow tube then falls back to a lower level. Once a thermometer is built, each level in the narrow tube corresponds to exactly one volume of liquid, and thus, to exactly one temperature.
A narrower tube (straw) results in a more accurate thermometer because the same expansion or contraction of fluid will cause a rise or fall over a longer distance. As a drawback, the narrow straw might decrease the maximum temperature that the thermometer can reach.
Various liquids can fill the reservoir of a thermometer. How much the liquid expands for each gained degree in temperature as well as its freezing and boiling point are all factors to consider when choosing a fluid for a liquid thermometer.
Cleanup
To dispose of the rubbing alcohol in the thermometer, pour the alcohol down the sink with plenty of running water. Flush well so no alcohol lingers in the pipe.
More to explore
Thermal Expansion, from Physics4kids.com
Balloon Morphing: How Gases Contract and Expand, from Science Buddies
Thermometer, from PBS Kids
This activity brought to you in partnership with Science Buddies

