
Key concepts
Water
Chemistry
Electricity
Molecules
Introduction
You use it every day and cannot survive without it—no it is not the Internet, but water! It is one of the most essential compounds in the world and has become an increasingly important issue everywhere. You probably have heard that in many places droughts or water pollution limits clean drinking water supplies, and those supplies keep shrinking. When considering this, have you ever wondered why we do not just make our own water? What water is actually made of? In this science activity you will use energy in the form of electricity to split water into its individual components; so gather all the materials and get ready to find out what they are—and separate them yourself!
Background
To find out what water is made of, it helps to look at its chemical formula, which is H2O. This basically tells us that the water molecule is composed of two elements: hydrogen and oxygen or, more precisely, two hydrogen atoms (H2) and one oxygen atom (O). Hydrogen and oxygen are gases at room temperature. So, does this mean that we can just combine both gases and then we get water? It is not quite as simple as that. What is missing in the equation is the energy component of the chemical reaction. Making water from its elements produces a large amount of energy. Chemical reactions that produce energy are also called exothermic reactions. In the case of hydrogen and oxygen the released energy is so high that it is almost impossible to control, and most of the time it leads to an explosion. Luckily, this reaction does not occur spontaneously and only happens when you ignite the gas mixture with a lighter.
On supporting science journalism
If you're enjoying this article, consider supporting our award-winning journalism by subscribing. By purchasing a subscription you are helping to ensure the future of impactful stories about the discoveries and ideas shaping our world today.
If making water from its elements is so dangerous, what about the reverse reaction? Splitting water into its two components is much easier to do and is called water electrolysis. Making hydrogen or oxygen this way seems simple. But as you probably suspected, this reverse reaction needs an energy input, which is why it is also called an endothermic reaction. In water electrolysis, the source of energy used for the reaction to occur is electricity. An easy way to generate electricity is with a battery. Because pure water is not good at conducting electricity, however, electrolysis requires the addition of an electrolyte, such as salt or acid. The electrolyte dissolves in water and separates into ions (electrically charged particles) that move through the solutions and are able to conduct electricity this way. To add electricity to the solution, you also need two electrical conductors that make contact with the water. These are called electrodes and are mostly metals or other conductive materials. When electrical current is applied to the electrodes, the ions (electrically charged atoms) in the electrolyte—including the positively charged protons (H+) and negatively charged hydroxyl ions (OH-) that result from the self-ionization of water—start moving toward the electrode with the opposite charge where either hydrogen or oxygen is produced. You can see this for yourself in this activity and even capture both gases!
Materials
Waterproof work area
Adult helper
Mechanical pencil graphite (thick enough that it does not break)—or a wooden pencil and a knife with which to have your adult helper extract the graphite
Glue
Play-Doh or other clay
Two or three disposable plastic cups (Clear plastic 18-ounce cups work best.)
Scissors
Permanent marker
Two metal thumbtacks
Distilled water
Baking soda
Nine-volt battery
Two transparent straws (jumbo size)
Teaspoon
Medical dropper
Timer
Paper towels
pH test strips (optional)
Table salt (sodium chloride—NaCl) (optional)
Preparation
Your work area should be waterproof; water spills might happen during the activity.
Collect your sturdy mechanical pencil graphite. Make sure you have two pieces of about 2.5 centimeters (one inch) in length. If you choose to use a wooden pencil, have an adult take the knife and extract the graphite lead from the pencil. (For this you should also get two pieces of about 2.5 centimeters in length). These will be your graphite electrodes.
With the scissors, carefully cut (or have an adult cut) around the open end of one plastic cup so it is the height of the nine-volt battery. In the bottom of the cup cut a hole so that the tip of the battery (with the two poles) can fit through.
Take the other cup and hold the bottom of that cup on top of the nine-volt battery. With the permanent marker, on the inside of the cup draw two dots on the bottom where the cup touches the two poles of the battery.
Take the cup away from the battery, and with a thumbtack, punch one hole through each of the points in the plastic cup bottom that you marked.
Carefully insert the two graphite (pencil core) pins through the two holes, one each. You might need to make the holes a little bit bigger so they fit.
Use the glue to make a seal around the graphite pins on the outside of the cup and let it dry. This should prevent water from leaking through. Make sure the graphite pins are not all covered in glue, otherwise they will not make contact to the battery anymore.
Place the cut cup, open-side down, over the battery. The cup bottom and the battery should fit together, creating one level surface on which you can place the other cup.
Put the cup with the graphite pins on the upside-down, cut cup, on top of the battery. It should sit there firmly and each of the graphite pins should contact one of the battery poles.
Seal one end of both jumbo drinking straws with Play-Doh or clay.
Procedure
Take the cup with the graphite pins and pour approximately 300 milliliters of distilled water into the cup, away from the battery. Make sure that it is not leaking. If it is, you might need to add a bit more glue to make a tight seal. Note: You want to avoid touching the water or the electrodes once the cup is placed on top of the battery as you might feel the electricity tingling your fingers.
As you did previously, place it on the upside-down, cut cup, on top of the battery so that each of the graphite pins contacts one of the battery poles. You might need to press it down a little to make a good connection. Observe the two graphite electrodes. What do you see? Is anything happening at the electrodes?
Remove the cup filled with distilled water from the battery. Fill one teaspoon with baking soda and stir it into the distilled water until everything is dissolved. What do you think the baking soda will change? What function does it have?
Now put the cup back on top of the battery and connect the graphite electrodes with the battery poles. What do you observe now? Does anything happen at the graphite pins? What do you think the reaction's products are? Compare the reactions that happen at each of the graphite electrodes. Can you see a difference between both sides? Is there one graphite electrode at which the reaction is more pronounced? Which pole of the battery is this graphite pin connected to, the positive or negative?
Put your nose inside the cup and smell the reaction products. Is there any smell? If so, how does it smell?
Remove the cup from the battery again. With the medicine dropper, fill both plugged-up jumbo straws with the baking soda solution from inside the cup that has the graphite pins. Once they are full, close each with one of your fingers and turn them upside down. Submerge them into the cup with the baking soda solution and carefully place them on top of the graphite pins (one straw on each) so that the straws stay completely filled with baking soda solution. If the straws do not stay upright, you can lean them against the side of the cup. What do you think will happen with the straws?
Once the straws are placed on top of the graphite pins, put the cup back on top of the battery. Leave it there for 10 minutes and press the cup down a little to make sure that the electrodes stay connected and the electrode reactions are happening continuously throughout that time. Observe the jumbo straws that you put on top of the graphite pins. What is happening to the water that you put in there? Do you notice a difference between the two water levels in both straws? Which one is higher, which is lower; to what battery poles are each of them connected?
After the 10 minutes are over, mark the water level in each of the straws with the permanent marker. How much more water was displaced by the reaction products on the negative pole compared with the positive pole? Is it the same, double or triple?
Extra: If you have any pH strips that can measure the acidity or basicity of solutions, use them to measure the pH in each of the jumbo straws once the water level decreases by about 50 percent. Carefully remove the jumbo straws from the electrodes and immediately seal each one with a finger once you lift it off the electrodes. Making sure you do not lose the water that is inside, dip a pH test strip inside. What color does the test strip show and what pH does this represent? Is there a difference between the solutions in the two straws? How do they differ, and why do you think this is the case?
Extra: Repeat the experiment, but instead of adding baking soda to the distilled water, add a teaspoon of table salt (sodium chloride, or NaCl) and let the electrolysis run for five minutes. Do the electrode reactions change? What about the smell of the reaction products; can you make out a certain smell this time? Why do you think this is?
Extra: Exchange the graphite electrodes with metal thumbtacks. You might need to use a fresh cup for this. Push the thumbtacks into the bottom of the cup so that they do not touch each other but so that each one touches one of the battery poles once you place the cup on top of the battery. With the thumbtacks no glue seal is needed. Repeat the original procedure but this time add one teaspoon of table salt to the distilled water. Observe the electrode reactions. What happens this time? Look closely at the pin that is connected to the positive battery pole. Can you see other reaction products besides gas? What do you think happened? How do the metal thumbtacks look after you take them out again?
Observations and results
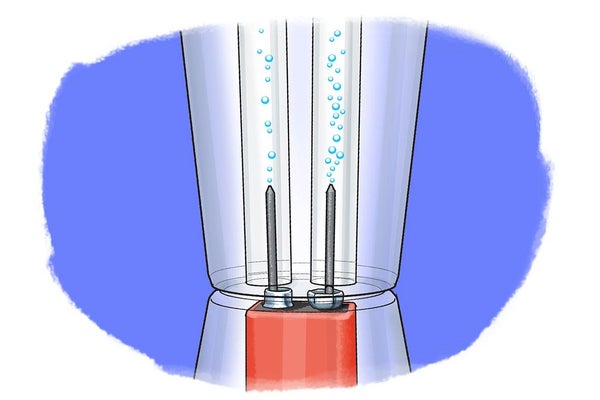
Were you able to split the water into hydrogen and oxygen gas? Did you see a lot of bubbles being produced at both of the graphite pins? Initially, when you put the cup with distilled water on top of the battery, you probably did not see much happening at the graphite electrodes. This is because distilled water does not conduct electricity very well, therefore no or only minor electrode reactions are possible. If you add electrolytes such as baking soda, however, the added ions can conduct electricity and you should have seen gas bubbles emerging at both of the graphite pins. On one side, at the positive pole, oxygen develops whereas at the negative pole, hydrogen is produced.
When you looked closely, you might have observed that on the graphite electrode connected to the negative pole of the battery more gas was formed than on the other side. Collecting the two gases with the jumbo straws probably demonstrated this even better. After 10 minutes the water level at the negative pole should have been about half that of the positive side, meaning that you collected about double the amount of hydrogen gas compared with oxygen. The difference is due to the fact that one water molecule has two hydrogen atoms to one oxygen atom, as explained above. This means it takes two water molecules (2 H2O) to make one oxygen molecule (O2). At the same time, however, two molecules of water (2 H2O) can make two molecules of hydrogen (2 H2). Whereas hydrogen and oxygen are formed at the electrodes, the leftover reaction products from water are protons (H+ on the side of oxygen) and hydroxyl ions (OH- on the side of hydrogen). You can visualize this by putting a pH strip into the solutions in the jumbo straws above each electrode. The solution in the straw that was put on top of the negative battery pole electrode should show a basic pH (7 or greater) whereas the other one should be acidic (pH less than 7).
Other electrode reactions can happen, too, if there are ions in the solution that compete with the hydrogen or oxygen production. You might have observed once you added salt (sodium chloride) to your electrolyte, it started smelling like at a swimming pool. Instead of oxygen, chlorine is produced at the positive battery pole, which is also used for disinfection of swimming pool water. If you used metal thumbtacks as electrodes instead of graphite pins, the metal (usually steel or brass) will dissolve, or corrode, at the positive battery pole and instead of (or in addition to) gas production, you should see that the metal thumbtack turns reddish brown. This demonstrates that electrolysis is not only a technique for splitting water into its components but can also drive other reactions that otherwise would not occur spontaneously.
Cleanup
Clean up any spills with a towel. Pour the water with the electrolyte (baking soda or salt) down the drain. Remove the electrodes (graphite pins or metal thumbtacks) from the cups and put them into the trash. Throw the plastic cups and the sealed jumbo straws into the trash. You can reuse the nine-volt battery.
More to explore
Why Can't We Manufacture Water?, from How Stuff Works
The Chemistry of Water, from Jill Granger
Electrolysis of Water—Hydrogen and Oxygen from Water, from Alternate Learning
Fuel Cells—Fueling the Future!, from Science Buddies
Science Activity for All Ages!, from Science Buddies
This activity brought to you in partnership with Science Buddies

