
Key concepts
Vision
Perception
Measurement
Introduction
It’s probably difficult to imagine a time with no television, no movies and no cartoons. But believe it or not, those times weren’t so long ago! What did those kids do when they couldn't watch movies? One of the most popular toys during that time was a great-grandfather of the modern cartoon. This toy was called a “thaumatrope,” and in this activity you’re going to make (and test) your own thaumatrope to learn about how vision works!
Background
Thaumatropes employ the same science used by the artists that draw your favorite cartoons. While watching a movie, we see characters jumping, running and dancing instead of seeing hundreds of still images. Our brain takes the images flashing on the screen and connects them to form a continuous stream of motion. This is known as the illusion of apparent motion.
On supporting science journalism
If you're enjoying this article, consider supporting our award-winning journalism by subscribing. By purchasing a subscription you are helping to ensure the future of impactful stories about the discoveries and ideas shaping our world today.
Thaumatropes use the same illusion to join two separate images into one image. They were one of the most popular toys available in the U.S. during the 1920s. Many of the original thaumatropes were made by gluing two pieces of paper together and spinning them on a string. In this activity you’ll use a rod, making it slightly easier to spin. But feel free to test other designs—see which one works best for you!
Materials
Chopstick or thin dowel rod (about 12 inches)
White paper (Construction paper or stiffer paper type works best.)
Permanent marker
Clear tape
A ruler
A pencil
Preparation
Cut out two circles from your paper, approximately two inches in diameter. For reference, we’ll call them “Circle 1” and “Circle 2.”
Find the center of Circle 1 using your ruler. Use your pencil to lightly draw a line across the center.
Line your ruler up along the centerline you just drew, then measure 0.25 inch from both edges of the circle. Mark the two points with your pencil.
On the left side of Circle 1, start at the 0.25-inch mark and write the letter “H” using your permanent marker. Make the letter large, approximately 1.5 inches tall.
Starting at the other 0.25-inch point, draw a large “!” with your permanent marker.
Now begin with Circle 2. Draw a centerline across the middle of Circle 2.
Line up your ruler along the centerline on Circle 2. Measure one inch from the right side and mark that point with your pencil.
Use your permanent marker to draw a large letter “I” at the one-inch point on Circle 2.
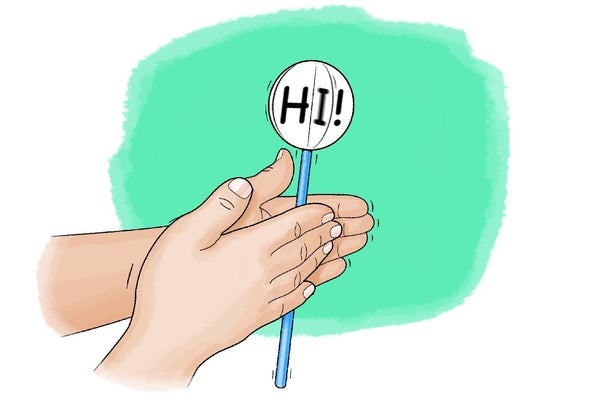
Sandwich your dowel rod between the two circles (with the writing facing out). Tape the paper to the rod, and then tape the paper together, creating a paper-and-dowel rod lollipop!
Hold the rod between both hands, with Circle 1 facing you.
Practice slowly turning the rod by rubbing your hands together, so that you see Circle 2, then Circle 1.
Once you have mastered rotating the circles, you're ready to start!
Procedure
Hold the rod between both hands with Circle 1 facing you.
Hum (or sing!) the ABC’s song. Rub your hands together to the beat of the song while looking at the circles. Does anything change about how the letters look? What do you see as you look at the circles?
Gradually increase the speed that you rotate the circles. Keep looking at them! What do you notice as the circles flip faster? Does anything change about how the letters look?
Rotate the rod as fast as you can while still looking at the circles. What do you notice about the letters on the circle?
Continue spinning the rod, but try blinking every second. Does blinking your eyes change the way the letters look? If so, what are the changes?
Extra: Try drawing other things on the circles. For example, draw a fish on Circle 1 and a fishbowl on Circle 2. See what happens!
Extra: Try testing the arrangement of letters (or pictures) on the two circles. What happens when you draw a letter on Circle 1 and a different letter in the same place on Circle 2?
Observations and results
When you rotated the rod at top speed, the letters on the Circle 1 and Circle 2 should have merged together, so that you saw the word “HI!”. Even though the letters are on two different sides of your “lollipop,” when you spin them quickly, your brain doesn’t process the two sides as separate images. Instead, it merges them together to create one word!
One reason our brains do this is to help us understand movement in the environment. When you watch a person walk across a room, you don’t see every tiny movement that person makes as they walk. Instead, you see a continuous, smooth motion. If you’ve ever been in a room with a strobe light, you know how important it is that our brains can do this for us. A person dancing to a strobe light can look like a robot, because their movements seem disconnected and separate. Our brains can’t connect the movements because the light is flashed only at relatively long intervals. You should have observed a similar effect when you watched the spinning circles while blinking. Even though you were spinning the circles at the same speed, your brain couldn’t connect the images as it did when your eyes were open.
More to explore
Apparent Motion and Animation, from Science Buddies
Now You See It, Now You Don’t: A Chromatic Adaption Project, from Science Buddies
Thaumatropes—Animation Lab Class, from Marysville Middle School
Science Activity for All Ages!, from Science Buddies
This activity brought to you in partnership with Science Buddies

