
Key concepts
Colors
Eyes
Vision
Illusions
Introduction
Have you ever wondered how visual illusions are created? Around Halloween we’re confronted with illusions that challenge our ability to correctly perceive things, such as in haunted houses. One way in which our eyes play tricks on us is through a phenomenon called an afterimage. These are images you see after staring at an object for several seconds and then looking away. In this science activity you’ll watch afterimages to learn about how your eyes perceive color.
Background
We perceive color using cells in the back of our eyes called cone cells. There are three different types of cone cells, and each roughly responds to red, green or blue light. For example, when you look at a red image the so-called red cones are stimulated and tell your brain that the object is red. The different cone cell types work together for you to see other colors, which are mixtures of these three colors. If you look at a purple image, for instance, which is a mix of red and blue, both the red and blue cones are stimulated. When all three colors are mixed the three types of cones are all stimulated and you see white light.
On supporting science journalism
If you're enjoying this article, consider supporting our award-winning journalism by subscribing. By purchasing a subscription you are helping to ensure the future of impactful stories about the discoveries and ideas shaping our world today.
If you look at one color very long, those cone cells can become fatigued and temporarily do not respond, which is how afterimages form. As long as this lasts, you don’t see with the fatigued cone cells but you can still use your other cone cells to see other colors. After several seconds, your fatigued cones will recover; the afterimage will fade away and colors will appear normal.
Materials
• Computer with a color monitor or a color printer and paper
• Stopwatch or clock that shows seconds
• Markers, colored pencils and paper or a basic computer graphics program (optional)
Preparation
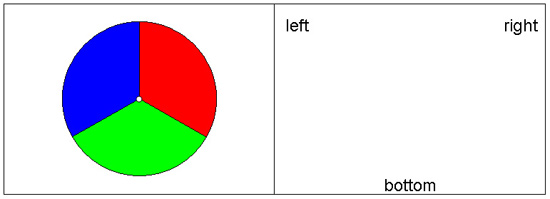
• To do this activity you will need a circle that is divided into thirds (like a pie chart). The top right third should be red; the bottom third should be green; and the top left third should be blue. You can access an online version of this image here. For this you will need to have access to a computer with a color monitor to show the image or you can print it out on a color printer. Or if you have a circle to trace, a ruler and colored markers, you could draw and color in the image yourself, (Try to replicate the model circle as closely as possible.) Make sure there is a white space next to your color circle that is larger than the circle.
• If there are any lights either right next to the computer monitor or colored circle printout, turn them off.
Procedure
• Stare at the image of the colored circles (focusing on the small white spot in the center) for 30 seconds.
• After staring at the circle for 30 seconds look at the white space to the right of it. What do you see?
• How are the colors in each part of the afterimage different from the parts of the original colored circle?
• Optional: You can use markers or colored pencils and paper or a basic computer graphics program to draw your results.
• Thinking about the rod colors (red, blue and green) and secondary colors (yellow, purple/magenta and cyan) and how afterimages are caused, see if you can explain your results. Why do you think you see the afterimage colors that you do?
• Extra: Time how long it takes the afterimage to disappear. Then look at the colored circle for only five seconds and again time how long it takes that afterimage to disappear. Did it take more or less time the second time?
• Extra: You could try repeating this activity, but this time pay attention to how long it takes for the afterimage of each different color to disappear. Do some colors fade away faster?
• Extra: Try doing this activity with several different people and have each person draw their results. Are they all the same or are some different?
• Extra: You could try this activity again but this time use objects or images that are different colors (colors other than the three primary additive ones, which were used in this activity). Can you accurately predict what the afterimages look like?
Observations and results
In the afterimage did you see that the top right part of the circle was cyan colored, the bottom part was purple-magenta and the top left part was yellow?
If you stare at a red object and immediately look at a white area afterward, you will see an afterimage that is the same size and shape, but it is blue-green, or cyan, in color. This is because your eyes use the red, green and blue cone cells to perceive white light, but because the red cone cells are fatigued, you do not see red. You are temporarily left seeing with only your green and blue cone cells. This is the same process that happened to your eyes in this activity, and it is why the color of each piece of the circle in the afterimage is a mixture of two of the three additive primary colors (red, blue and green), specifically the two that were not in the corresponding piece of the original image. Mixing two of the three primary colors results in the following secondary colors: red and green appears as yellow, red and blue becomes purple (including magenta), and green and blue turns to cyan.
More to explore
Afterimage, from Dresden University of Technology
2013 Best Illusion of the Year Contest, from Neural Correlate Society
The Eye, from George Mather, University of Sussex
Are Your Eyes Playing Tricks on You? Discover the Science Behind Afterimages!, from Science Buddies
This activity brought to you in partnership with Science Buddies
